[안드로이드] 유용한 CalendarView 라이브러리들을 알아보자
안녕하세요! 개발자 파쿠입니다.
이번 포스팅엔 기본으로 제공하는 CalendarView를 제외한,
커스텀된 달력 라이브러리에 대해 공유해보고자 합니다.
시작하기 앞서, 본 포스팅에선 제가 유용하게 사용중인 두가지의 라이브러리 만을 다루고 있습니다.
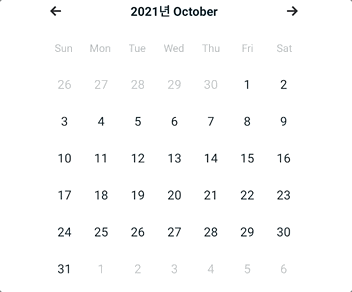
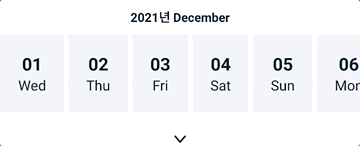
먼저 결과 화면부터 보고 시작하겠습니다!
kizitonwose/CalendarView
miso01/SingleRowCalendar
0) Gradle에 Library 추가
역시나 당연하게도 Library를 추가해 주어야겠죠?
app수준의 gradle파일로 들어가 준 후, dependency 내에 사용하실 라이브러를 추가해줍니다.
kizitonwose/CalendarView
implementation 'com.github.kizitonwose:CalendarView:1.0.4'miso01/SingleRowCalendar
implementation 'com.michalsvec:single-row-calednar:1.0.0'해당 라이브러리들의 버전은 포스팅 기준 (21.12.30) 기준으로 작성되었습니다.
해당 라이브러리들의 최신 버전을 확인하시려면 kizitonwose , miso01 링크로 들어가져서 확인해 주신후 적용해 주세요.
라이브러리들에 대한 상세한 내용은 각각의 github에 나와있습니다.
본 포스팅에선 구현 방법에 대해서만 다루도록 하겠습니다.
동기화 까지 하셨다면 다음 단계로 넘어가겠습니다.
1 -1 ) kizitonwose CalendarView
기본 CalendarView와 유사한 라이브러리인데요, 다른점은 커스텀을 좀 더 다양하게 할수있다는 점입니다.
fragment.xml
<androidx.constraintlayout.widget.ConstraintLayout
    android:id="@+id/cl_calendar"
    android:layout_width="0dp"
    android:layout_height="wrap_content"
    android:background="@drawable/background_half_curved_bottom"
    android:elevation="1dp"
    android:paddingHorizontal="60dp"
    android:visibility="gone"
    app:layout_constraintEnd_toEndOf="parent"
    app:layout_constraintStart_toStartOf="parent"
    app:layout_constraintTop_toBottomOf="@id/tab_cash">

    <TextView
        android:id="@+id/tv_calendar_indicator"
        android:layout_width="wrap_content"
        android:layout_height="wrap_content"
        android:gravity="center"
        android:lineSpacingExtra="5.6sp"
        android:padding="12dp"
        android:singleLine="true"
        android:text="@{output.localizedMonth}"
        android:textColor="@color/indigo"
        android:textSize="14sp"
        android:textStyle="bold"
        app:layout_constraintEnd_toEndOf="parent"
        app:layout_constraintStart_toStartOf="parent"
        app:layout_constraintTop_toTopOf="parent"
        tools:text="2021년 9월" />

    <ImageButton
        android:id="@+id/btn_monthPrev"
        android:layout_width="wrap_content"
        android:layout_height="wrap_content"
        android:background="@null"
        android:src="@drawable/ic_backward"
        app:layout_constraintBottom_toBottomOf="@id/tv_calendar_indicator"
        app:layout_constraintStart_toStartOf="parent"
        app:layout_constraintTop_toTopOf="@id/tv_calendar_indicator" />

    <ImageButton
        android:id="@+id/btn_monthNext"
        android:layout_width="wrap_content"
        android:layout_height="wrap_content"
        android:background="@null"
        android:src="@drawable/ic_forward"
        app:layout_constraintBottom_toBottomOf="@id/tv_calendar_indicator"
        app:layout_constraintEnd_toEndOf="parent"
        app:layout_constraintTop_toTopOf="@id/tv_calendar_indicator" />

    <androidx.fragment.app.FragmentContainerView
        android:id="@+id/fragment_day_of_weeks"
        android:name="com.incarpay.incarpay_android.view.main.calendar.CalendarDayOfWeeksFragment"
        android:layout_width="0dp"
        android:layout_height="wrap_content"
        app:layout_constraintEnd_toEndOf="parent"
        app:layout_constraintStart_toStartOf="parent"
        app:layout_constraintTop_toBottomOf="@id/tv_calendar_indicator" />

    <com.kizitonwose.calendarview.CalendarView
        android:id="@+id/calendar"
        android:layout_width="0dp"
        android:layout_height="wrap_content"
        android:background="@color/white"
        android:paddingHorizontal="1dp"
        android:paddingBottom="10dp"
        app:cv_dayViewResource="@layout/item_calendar_day"
        app:cv_hasBoundaries="true"
        app:cv_orientation="vertical"
        app:cv_outDateStyle="endOfGrid"
        app:cv_scrollMode="paged"
        app:layout_constraintBottom_toTopOf="@id/btn_upper"
        app:layout_constraintEnd_toEndOf="parent"
        app:layout_constraintStart_toStartOf="parent"
        app:layout_constraintTop_toBottomOf="@id/fragment_day_of_weeks" />

</androidx.constraintlayout.widget.ConstraintLayout>
CalendarDayOfWeeksFragment.xml
<androidx.constraintlayout.widget.ConstraintLayout
    android:layout_width="match_parent"
    android:background="@color/white"
    android:layout_height="wrap_content">

    <TextView
        android:id="@+id/tv_day_of_week_0"
        style="@style/DayOfWeek"
        android:layout_width="0dp"
        android:layout_height="wrap_content"
        android:paddingVertical="12dp"
        android:textStyle="normal"
        app:layout_constraintBottom_toBottomOf="parent"
        app:layout_constraintEnd_toStartOf="@id/tv_day_of_week_1"
        app:layout_constraintStart_toStartOf="parent"
        app:layout_constraintTop_toTopOf="parent" />

    <TextView
        android:id="@+id/tv_day_of_week_1"
        style="@style/DayOfWeek"
        android:layout_width="0dp"
        android:layout_height="wrap_content"
        android:paddingVertical="12dp"
        android:textStyle="normal"
        app:layout_constraintBottom_toBottomOf="parent"
        app:layout_constraintEnd_toStartOf="@id/tv_day_of_week_2"
        app:layout_constraintStart_toEndOf="@id/tv_day_of_week_0"
        app:layout_constraintTop_toTopOf="parent" />

    <TextView
        android:id="@+id/tv_day_of_week_2"
        style="@style/DayOfWeek"
        android:layout_width="0dp"
        android:layout_height="wrap_content"
        android:paddingVertical="12dp"
        android:textStyle="normal"
        app:layout_constraintBottom_toBottomOf="parent"
        app:layout_constraintEnd_toStartOf="@id/tv_day_of_week_3"
        app:layout_constraintStart_toEndOf="@id/tv_day_of_week_1"
        app:layout_constraintTop_toTopOf="parent" />

    <TextView
        android:id="@+id/tv_day_of_week_3"
        style="@style/DayOfWeek"
        android:layout_width="0dp"
        android:layout_height="wrap_content"
        android:paddingVertical="12dp"
        android:textStyle="normal"
        app:layout_constraintBottom_toBottomOf="parent"
        app:layout_constraintEnd_toStartOf="@id/tv_day_of_week_4"
        app:layout_constraintStart_toEndOf="@id/tv_day_of_week_2"
        app:layout_constraintTop_toTopOf="parent" />

    <TextView
        android:id="@+id/tv_day_of_week_4"
        style="@style/DayOfWeek"
        android:layout_width="0dp"
        android:layout_height="wrap_content"
        android:paddingVertical="12dp"
        android:textStyle="normal"
        app:layout_constraintBottom_toBottomOf="parent"
        app:layout_constraintEnd_toStartOf="@id/tv_day_of_week_5"
        app:layout_constraintStart_toEndOf="@id/tv_day_of_week_3"
        app:layout_constraintTop_toTopOf="parent" />

    <TextView
        android:id="@+id/tv_day_of_week_5"
        style="@style/DayOfWeek"
        android:layout_width="0dp"
        android:layout_height="wrap_content"
        android:paddingVertical="12dp"
        android:textStyle="normal"
        app:layout_constraintBottom_toBottomOf="parent"
        app:layout_constraintEnd_toStartOf="@id/tv_day_of_week_6"
        app:layout_constraintStart_toEndOf="@id/tv_day_of_week_4"
        app:layout_constraintTop_toTopOf="parent" />

    <TextView
        android:id="@+id/tv_day_of_week_6"
        style="@style/DayOfWeek"
        android:layout_width="0dp"
        android:layout_height="wrap_content"
        android:paddingVertical="12dp"
        android:textStyle="normal"
        app:layout_constraintBottom_toBottomOf="parent"
        app:layout_constraintEnd_toEndOf="parent"
        app:layout_constraintStart_toEndOf="@id/tv_day_of_week_5"
        app:layout_constraintTop_toTopOf="parent" />
</androidx.constraintlayout.widget.ConstraintLayout>
item.xml
<androidx.constraintlayout.widget.ConstraintLayout
    android:layout_width="match_parent"
    android:layout_height="wrap_content"
    android:background="@color/white">

    <TextView
        android:id="@+id/tv_day"
        android:layout_width="wrap_content"
        android:layout_height="wrap_content"
        android:gravity="center_horizontal"
        android:lineSpacingExtra="7sp"
        android:textColor="@color/indigo"
        android:textSize="14sp"
        android:textStyle="normal"
        app:layout_constrainedHeight="true"
        app:layout_constrainedWidth="true"
        app:layout_constraintBottom_toBottomOf="parent"
        app:layout_constraintEnd_toEndOf="parent"
        app:layout_constraintStart_toStartOf="parent"
        app:layout_constraintTop_toTopOf="parent"
        tools:ignore="SmallSp"
        tools:text="16"
        tools:textColor="@color/black" />

</androidx.constraintlayout.widget.ConstraintLayout>
가장 상단의 뷰 부터 역활을 알아보겠습니다. 뷰의 명칭은 해당 뷰의 id값으로 말씀드리겠습니다.
- tv_calendar_indicator : 년도와 월을 표시합니다.
- btn_monthPrev : 이전 달 을 표시합니다
- btn_monthNext: 이후 달 을 표시합니다
- fragment_day_of_weeks: 요일을 표시합니다.
- calendar: 전체적인 캘린더를 표시합니다.
- tv_day: 캘린더의 각각의 날짜를 표시합니다.
1 -2) item과 calendar 결합하기
이제 캘린더뷰 안에 날짜를 넣어줄 바인더를 만들어줘야 하는데요,
이곳에서 날짜가 선택됬을떄와 같은 이벤트를 처리할수 있습니다.
해당 예제에선 선택된 두 날짜간의 이벤트를 간단히 구현해 보았습니다.
Binder.class
class CalendarDayBinder(
    private val calendarView: CalendarView
): DayBinder<CalendarDayBinder.DayContainer> {
    private var calendar: Pair<LocalDate?, LocalDate?> = null to null

    var input: Input? = null

    fun updateCalendar(
        calendar: Pair<LocalDate?, LocalDate?>,
    ) {
        if (this.calendar == calendar) return
        this.calendar = calendar
        this.calendarView.notifyCalendarChanged()
    }
    override fun create(view: View): DayContainer {
        val binding = ItemCalendarDayBinding.bind(view)
        return DayContainer(binding)
    }

    override fun bind(container: DayContainer, day: CalendarDay) {
        val (startDate,endDate) = this.calendar

        container.binding.tvDay.text = day.date.dayOfMonth.toString()

        container.binding.root.setOnClickListener { _->
            input?.onDayClick(day.date)
        }
        if (day.owner != DayOwner.THIS_MONTH){
            container.binding.tvDay.setTextColor(ContextCompat.getColor(calendarView.context,R.color.trans_indigo))
        }else {
            container.binding.tvDay.setTextColor(ContextCompat.getColor(calendarView.context,R.color.indigo))
        }

        if (isInRange(day.date)){
            container.binding.root.setBackgroundColor(ContextCompat.getColor(calendarView.context,R.color.whiteGrey))
        }
        if (startDate == day.date){
            container.binding.root.background = (ContextCompat.getDrawable(calendarView.context,R.drawable.calendar_start))
        } else if(endDate == day.date){
            container.binding.root.background = (ContextCompat.getDrawable(calendarView.context,R.drawable.calendar_end))
        }

    }

    private fun isInRange(date: LocalDate): Boolean {
        val (startDate, endDate) = this.calendar
        return startDate == date ||
                endDate == date ||
                (startDate != null && endDate != null && startDate < date && date < endDate)

    }

    class DayContainer(
        val binding: ItemCalendarDayBinding
    ) : ViewContainer(binding.root)

    abstract class Input {
        abstract fun onDayClick(date: LocalDate)
    }
}
이전에 생성한 CalendarDayOfWeeks.xml 의 Fragment도 생성해 줍니다.
그리고 요일을 표시해줄 로직도 작성해 줍니다.
override fun onViewCreated(view: View, savedInstanceState: Bundle?) {
    super.onViewCreated(view, savedInstanceState)
    val locale = Locale.getDefault()
    var dayOfWeek = WeekFields.of(locale).firstDayOfWeek
    val iterator = (viewDataBinding.root as ViewGroup).children.iterator()
    while (iterator.hasNext()) {
        val textView = iterator.next() as TextView
        textView.text = dayOfWeek.getDisplayName(TextStyle.SHORT, locale)
        dayOfWeek = dayOfWeek.plus(1)
    }
}
여기까지 작성하셨다면 이제 Activity/Fragment 로 이동해줍니다.
1-3) 캘린더에 데이터 넣어주기
Fragment.class
    private val currentMonth = YearMonth.now()
    private val startMonth = current.minusMonths(1)
    private val endMonth = current.plusMonths(1)
    private var calendar: Pair<LocalDate?, LocalDate?> = null to null
    private val binder = CalendarDayBinder(binding.calendar).apply {
        input = object : CalendarDayBinder.Input(){
            override fun onDayClick(date: LocalDate) = onDayClick(date)
         }
     }

// onViewCreated
	with(binding.calendar){
		(itemAnimator as? SimpleItemAnimator)?.supportsChangeAnimations = false
		dayBinder = binder
		monthScrollListener = { calendarMonth ->
		onMonthScrolled(calendarMonth.yearMonth)
		}
	}
	binding.calendar.setup(
		startMonth,
		endMonth,
		WeekFields.of(Locale.getDefault()).firstDayOfWeek
	)

    private fun onMonthScroll(currentMonth: YearMonth) {
        val visibleMonth = binding.calendar.findFirstVisibleMonth() ?: return
        if (currentMonth != visibleMonth.yearMonth){
            binding.calendar.smoothScrollToMonth(currentMonth)
        }
    }

    private fun onDayClick(date: LocalDate){
        val (start, end) = calendar

        calendar = when {
            start == null -> {
                date to end
            }
            end == null -> {
                start to date
            }
            else -> {
                null to null
            }
        }
        binder.updateCalendar(calendar)
    }
캘린더에 넣어줄 시작/마지막 월을 셋업해준 후,
스크롤 해서 달력을 넘겼을때/ 날짜를 클릭했을떄와 같은 클릭 이벤트에대한 처리도 작성해 줍니다.
온클릭 이벤트 같은경우는 바인더에서 처리하는 방법도있지만 나중에 추가될수있는 다양한 처리를 대응하려면
엑티비티나 뷰모델에서 작업하는게 더 옳은 방식입니다.
여기까지 작성해 주셨다면 끝입니다!
2-1) miso01/SingleRowCalendar
해당 라이브러리는 이름에서부터 나와있듯이 한줄로만 표현하는 캘린터 뷰에 특성화된 뷰 입니다.
보여드릴 예제에선 구현에만 중점을 두었으며 라이브러리에 대한 자세한 기능과 내용은, 상단의 깃허브 주소를 참조해주세요!
캘린더를 보여줄 xml 파일을 작성해 줍니다.
fragment.xml
<androidx.constraintlayout.widget.ConstraintLayout
    android:id="@+id/cl_row_calendar"
    android:layout_width="0dp"
    android:layout_height="wrap_content"
    android:layout_marginTop="20dp"
    android:background="@drawable/background_half_curved_bottom"
    android:elevation="1dp"
    app:layout_constraintEnd_toEndOf="parent"
    app:layout_constraintStart_toStartOf="parent"
    app:layout_constraintTop_toBottomOf="@id/tab_cash">

    <TextView
        android:id="@+id/tv_row_calendar"
        android:layout_width="wrap_content"
        android:layout_height="wrap_content"
        android:gravity="center_horizontal"
        android:lineSpacingExtra="5.6sp"
        android:text="@{output.localizedMonth}"
        android:textColor="@color/indigo"
        android:textSize="14sp"
        android:textStyle="bold"
        app:layout_constraintBottom_toTopOf="@id/rowCalendar"
        app:layout_constraintEnd_toEndOf="parent"
        app:layout_constraintStart_toStartOf="parent"
        app:layout_constraintTop_toTopOf="parent"
        tools:text="2021년 9월" />

    <com.michalsvec.singlerowcalendar.calendar.SingleRowCalendar
        android:id="@+id/rowCalendar"
        android:layout_width="match_parent"
        android:layout_height="wrap_content"
        android:layout_marginTop="10dp"
        app:deselection="false"
        app:layout_constraintBottom_toTopOf="@id/btn_lower"
        app:layout_constraintTop_toBottomOf="@id/tv_row_calendar"
        app:longPress="false"
        app:multiSelection="false" />

</androidx.constraintlayout.widget.ConstraintLayout>
2-2) 캘린더에 데이터 넣어주기
해당 라이브러리의 구현방법은 엄청 간단한 편인데요 방금 만들어준 뷰에 데이터만 결합해 준다면 끝입니다.
fragment.class
private val calendar = Calendar.getInstance()
private var currentMonth = 0
private val rowCalendarManager = object : CalendarViewManager {
    override fun setCalendarViewResourceId(
    position: Int,
    date: Date,
    isSelected: Boolean
    ): Int {
        val cal = Calendar.getInstance()
        cal.time = date
        return if (isSelected)
            when (cal[Calendar.DAY_OF_WEEK]) {
                else -> R.layout.item_calendar_day_selected
            }
        else
            when (cal[Calendar.DAY_OF_WEEK]) {
                else -> R.layout.item_calendar_day_unselected
            }
    }
    override fun bindDataToCalendarView(
        holder: SingleRowCalendarAdapter.CalendarViewHolder,
        date: Date,
        position: Int,
        isSelected: Boolean
    ) {
        holder.itemView.tv_day.text = DateUtils.getDayNumber(date)
        holder.itemView.tv_week.text = DateUtils.getDay3LettersName(date)
    }
}

//ViewCreated
val rowCalendarChangesObserver = object: CalendarChangesObserver {
    @SuppressLint("SetTextI18n")
        override fun whenSelectionChanged(isSelected: Boolean, position: Int, date: Date) {
            super.whenSelectionChanged(isSelected, position, date)
        }
}
val rowSelectionManager = object : CalendarSelectionManager {
    override fun canBeItemSelected(position: Int, date: Date): Boolean {
        return true
    }
}
rowCalendar.apply {
    calendarViewManager = rowCalendarManager
    calendarChangesObserver = rowCalendarChangesObserver
    calendarSelectionManager = rowSelectionManager
    setDates(getFutureDatesOfCurrentMonth())
    init()
}

private fun getFutureDatesOfCurrentMonth(): List<Date> {
    currentMonth = calendar[Calendar.MONTH]
    return getDates(mutableListOf())
}
private fun getDates(list: MutableList<Date>): List<Date> {
    calendar.set(Calendar.MONTH, currentMonth)
    calendar.set(Calendar.DAY_OF_MONTH, 1)
    list.add(calendar.time)
    while (currentMonth == calendar[Calendar.MONTH]) {
        calendar.add(Calendar.DATE, +1)
        if (calendar[Calendar.MONTH] == currentMonth)
            list.add(calendar.time)
    }
calendar.add(Calendar.DATE, -1)
return list
}
상단에 rowCalendarManager에 inflate 해줄 아이템들은 선택/미선택 되었을떄의 날짜의 뷰를 만들어서 넣어주면 됩니다.
여기까지 두가지 캘린더 라이브러리를 구현해 보았는데요, 이해가 어려우신 부분이 있다면 댓글로 남겨주세요 :)
이상 포스팅 마치겠습니다. 감사합니다!